Now you might say to yourself – isn’t this instructional model outdated? Well, no, it’s the cornerstone for creating effective instructional content.
Wait. What?
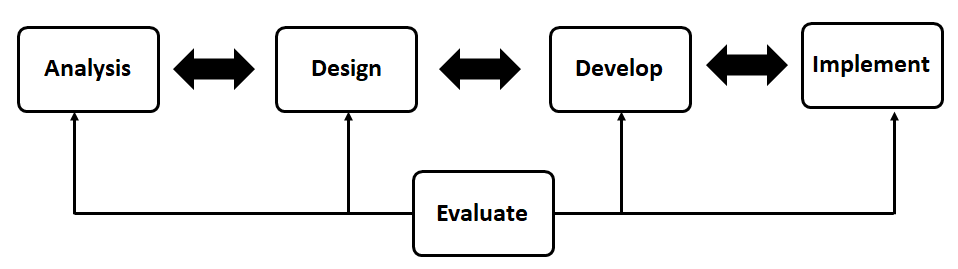
For those unfamiliar with this model, ADDIE is an acronym for Analyze, Design, Develop, Implement, and Evaluate (ADDIE). This model initially appeared during the 1950’s as a way to train recruits in the U.S. military. In the 1970’s this model was formally introduced by learning designers Robert Gagné and Robert Glaser.
Initially ADDIE was visually represented as a linear flow from Analyze through Evaluate.

Due to various constraints of the process, it was upgraded to include a feedback loop at both the preceding and succeeding stages. And not only that, the process is no longer linear. You can move forwards and backwards through the process at any time and many times. Huh?
Now this is a sweet model!
Do I still use this model? Yup.
I use this model all day, every day. Why? Because it Works, every single time. Yes, we have other models like SAM, Bloom’s Taxonomy, Kirkpatrick, and Gagne’s Nine Events of Instruction, and I’m not saying you can’t use them. I just happen to know what works for me and how these steps have not let me down. I do however throw in Blooms and cycle into Kirkpatrick if I feel it necessary. But mainly my model of choice is ADDIE.
To help with your instructional design work, here is the break down of the ADDIE model:
Analysis
The Analysis phase requires that you get answers to fundamental questions such as:
- Statement of learning need
- Target Audience
- Learning objectives
- Instructional approach (clear instruction, maximize participation, provide specific feedback)
- Course structure and duration (whole and by module)
- Use of media
- Use of interactive exercises such as quizzes
- Evaluation strategy
- Development of training created internally or externally
- Creation of Project Charter and Estimate Costing
After the Analysis Phase, the following questions should be answered:
- What is the gap/need identified in the training?
- What are the learning objectives?
- Is eLearning the right strategy?
- Is there an evaluation standard for the training?
- Who is my target audience and are they enterprise wide?
- How do I get in contact with the IT staff in order to upload my training?
Design
During the design phase, you should use the findings from your analysis to outline the training content and how it will flow. Usually this consists of a design plan and storyboard. Take a look at my backwards design post and understand how using this process can help with keeping your training cohesive.
These are the primary tasks within the Design phase:
- Introduction and Background
- Course Level Details
- Module Level Details
- Content and exercises mapped to each course learning outcome (in bulleted or outline format)
- Graphics designated to enhance content
- Estimated Duration, by course, module and lesson (if applicable)
- Proposed use of narration, if applicable
- Specific use of additional audio and/or video, if recommended
- Activity and/or Knowledge Check, including number and type of test items and feedback
After the Design Phase, the following questions should be answered:
- Do learners know why they are taking the course?
- Is there a brief introduction outlining how long the course will take and what it covers?
- Are there clear learner-focused objectives?
- Are there quiz questions or inter-activities?
- Do the inter-activities check learner understanding/performance relative to the objectives?
Storyboard Development
Using the software that best helps you to create a storyboard, the following items should be included:
- Project information (e.g. title, unit #, section #, etc.)
- On-screen text
- Audio and narration information (e.g. audio script, sorted by actors/voices)
- Interactivity / quiz questions (with correct answers and feedback)
- Graphic descriptions (e.g., royalty-free photos, diagrams, descriptions of planned Flash animations)
- Any links or resources to be included in the training
- End-of-course knowledge check answer key
The Knowledge checks will identify, by objective, the:
- Assessment item that effectively tests learner mastery of an objective
Once the Storyboard has been completed, the draft training should be reviewed. This will be the first review cycle. All comments should be documented on a comment form should there be any revisions and/or deletions made.
The Client should allot at least 10 working days for review. This may be shorter or longer as appropriate.
Once the comments have been received, the Client and Instructional Designer should work together closely to go through and revise the training as necessary.
Until all issues are resolved to the Client’s satisfaction, then the Storyboard can be submitted as final and the Client should secure all necessary approvals and sign off. Please review your Project Charter for dates of completion for Storyboard approval. Your final product can also be considered a Prototype.
Working Prototype
The difference between a storyboard and a working prototype is that a storyboard expresses the idea to everyone and a prototype simulates the real product.
A working prototype attempts to simulate the final design, look and feel, materials and functionality of the final product. Some designers like to work within the software and create smaller prototypes as full-scale can be costly.
Aren’t storyboards redundant?
First off, I have done instructional work for many years. When I work with clients, I usually combine the Design and Development process together. I combine them because the software I use for development has become so advanced that I can create a working prototype as I am designing. Then when I start my review cycle, we are half way to completion.
For me, creating a storyboard involves the same time as it takes to make the prototype. One of the best working prototypes that I use is called Articulate RISE – this is for website design. And guess what? My clients love seeing the work that I am doing come together so fast!
Development
But wait, didn’t you just create something – the prototype? Yes, I did.
So what do you do? When if you have indeed created a storyboard, proceed to building the working product. If you created this when you were designing, make sure that your sequence and structure is accurate and accessibility of the training is included.
Isn’t development time consuming?
Now, I’m sure that you have heard from others that development takes the longest, but it doesn’t. The analysis and design portion is the longest. Once you have received approval of the design concept, development should be relatively simple because you now have all the pieces that are required to fit into your course. So, essentially you are dropping in content that has been determined as correct and you can adjust for sequencing. In some cases, you can even import your storyboard into software that will automatically create slides for you. Or if you are like me as mentioned above, you combined it with your design time and your working prototype is a viable product.
Final review cycle
At this point, you should run a review cycle concurrently with external reviewers.
Please make sure to have all reviewers document their comments on a comment form.
Clients should allot at least one full working week (depending on size) to review and receive feedback. Once the feedback has been received, all work should continue within the Captivate file – all images and PowerPoint slides can be manipulated within the software.
The Client and the Instructional Designer will work together closely to go through and revise training as necessary.
When all issues are resolved to the Client’s satisfaction, then the training can be submitted as final and the Client should secure all necessary approvals and sign off. Please review your Project Charter for dates of completion for training approval.
Implementation
In the Implementation phase, the Client, the Instructional Designer and the LMS administrator will all work closely together to ensure a smooth and successful upload and the final launch of the training. This is the phase where everything comes together and the intended audience receives the training.
You should also include the creation of FAQ’s. This allows learners to troubleshoot questions they may come across.
Evaluation
The Evaluation phase is an ongoing activity that is conducted throughout the project. However, this phase if conducted after the training goes live, usually consists of both formative and summative evaluation summaries.
A formative evaluation is a review that looks at each stage of the ADDIE process to redefine, revise and make sure that learning outcomes are on track and content is succinct.
A summative evaluation is a review that makes sure that the training did what it was designed to do, and these results usually come from a feedback form based on specific criterion from your audience.
Whew! We did it! That’s the ADDIE model from top to bottom. Let’s create training!


Pingback: Welcome to the Friendly Professor — a practical guide to learning, teaching, and designing better experiences. - Friendly Professor